My Modern Bathroom Remodel
- Shalae
- Dec 28, 2021
- 8 min read

We recently completed a complete remodel of our master bathroom, and I’m sharing the process of designing it and planning for great storage and organization, since that’s what was most important to me!
Let’s start with a few pictures of what this bathroom looked like BEFORE we demolished it (I’m admittedly not great at remembering to take the ‘before’ pictures, but hopefully this gives you an idea of the layout... I took these screenshots from a video that I took on the day we started the demo).
*Take notice that the shower is on the left, the bathtub is on the right, and the vanity is pretty long! All of that changed.
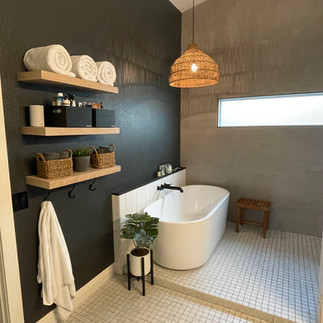
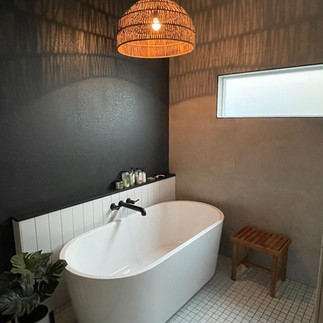
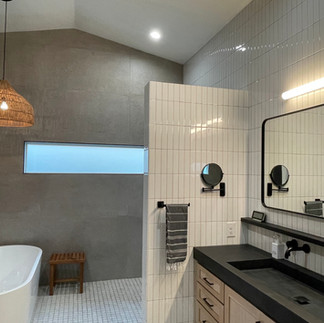
Here is what our bathroom looks like now:
(Can you believe it’s the same space?) The tub is now freestanding on the left, the shower is on the right, and the vanity is not as long as it used to be. I’ll show you why it stores more than the previous vanity did though!
Open Shelves
Let’s start with the open-shelves and work our way around the bathroom. I had our cabinet maker build these floating shelves so that they would match the vanity. I knew that I wanted a place to store my hair products and lotions that wasn’t in the vanity OR on the counter. The “old” bathroom had floating shelves and I LOVED them, so I repeated the idea. Cute baskets and nicely folded (or rolled!) towels look good on them, in my opinion.

*TIP: Many people struggle to find space for everything in their bathrooms. If your towels are taking up valuable storage space, think about how many you REALLY need to keep on hand. My husband and I use a total of 3 towels a day (1 for him, 1 for my body, and 1 for my hair). I keep only 3 extra so that when I wash our towels, we have enough extras. We never need more than 3 extras in our bathroom.
I thought through everything I would want to store on my floating shelves, and made sure to space them out far enough for the tallest item to fit on the shelf, but not much more than that. I also knew that I wanted to put a speaker on the shelves. (Who else loves to turn on music while you get ready in the morning?!) For this reason, I asked our contractor to place an outlet on the wall behind the shelves, where it (and the speaker cord) could be hidden! I’m so glad that I thought about that extra outlet in my bathroom, because I do not like to keep anything on my counters, which is where the speaker would’ve had to sit otherwise.

Lighting
Along the lines of electrical work, I am really happy that we have different lighting options in the bathroom. We have a light hanging above the tub, recessed lighting in all corners of the bathroom, and a light over the mirror area too. It is nice to be able to turn just one or two on OR all three on! These are things to think about during the process instead of at the end!
Freestanding Tub Area
Moving on to the tub area: I found a picture on pinterest that was the most inspiring picture for my bathroom. It showed a freestanding tub sitting in front of a wall with a ledge, and vertical tiles behind it. I love that the ledge provides a place to keep my bubble bath and other items with intention. It looks like the ledge was made for that stuff (which it was)!

TIP: I will say, my bath products look nice on the ledge because they are all from the same line and have similar packaging. That is something to keep in mind when you want your bathroom to look simple and organized.

We had Compound Concrete, a local company, make the ledge as well as the counter and ledge in the vanity area, which I will get to! I have always loved stripes and straight lines when it comes to clothing and home decor, and I’ve realized that I like that in home design elements as well. The straight lines of grout between the vertical tiles is so pleasing to my eyes! My style is also very simple without intricate details, as you can see by my choice of fixtures and the tub too.
Shower Area

You might be asking the same thing about our shower that almost everybody asks us: “Does the floor outside of the shower or the tub get wet when we shower?” The answer is no, it actually doesn’t… but we didn’t know that for sure until everything was said and done and we were able to use our shower. Our thought was that we could add on a glass enclosure afterward if necessary, but I am so glad that we don’t need to. I love that we can walk straight into the shower without a door. The tile does not transition as you step up into the shower, because I wanted this bathroom to look like one big area rather than separate areas.

(The tile on the back wall is large format 24x48 tiles, meant to look like concrete. I am very happy with it… I was nervous about it looking like patterned tiles but I think it pulls off the concrete look well!)

Inside of the shower, we had the framer build out a half wall to create a ledge for shower products. I love it. I think this bathroom is basically the bathroom of ledges! I like the storage space they provide, and I think I have made it look nice by using refillable bottles for my shampoo, conditioner, and soaps that match.

The little cut-out that holds soap bars and razors was a last minute idea as the framers were working in that area, and I’m so glad I didn’t miss the opportunity to have that carved out for my smaller items.
A few things I would change in this bathroom if I did it over again:
Two things I would change in my bathroom if I could, is
1. the frame color on the window (I wish it was black!), and
2. where we decided to mount the hand-held shower.

We placed it kind of high up on the pony wall, thinking that it would sit right at about the same level where a normal shower head would sit. HOWEVER… if it had been mounted lower, it would still be able to move up higher on the wall AND down lower to reach and spray off the floor of the shower easier. There is no use for having the cord of the handheld faucet reach higher than where it’s mounted. I do wish it could reach down lower and across my shower to spray things off though.

The valve for turning the shower on and off (and colder/hotter) is placed perfectly. My dad did all the plumbing work for us, and that was his idea! I would not have thought through this concept if he hadn’t mentioned it, but we are able to turn our shower on while standing outside of it, without getting wet! I’m so used to seeing shower valves sit under the shower heads, but this actually makes way more sense.

The tile in our shower area and up the entire wall, is the smaller version of the big tiles used behind our tub. Both came from DalTile. The larger size is 4x16 and the smaller size is 2x8. I really like the stacked tile look!
Vanity Area
Finally, let’s talk about the vanity area. Like I said earlier, I designed this bathroom with organization in mind and I have to say, I nailed it! (Haha!)

This vanity is less wide than my last vanity, but provides more and much better storage! First of all: It’s taller than the last one was. This allowed me to get 4 drawers on each side, and they are good size drawers! Second of all, it’s also deeper than the last vanity was. I asked our cabinet maker if it was possible to make it a bit deeper, and he delivered!

My last vanity had 2 sinks, cabinets under each sink, and 3 drawers in the middle. Let me tell you why I didn’t like that design: 1. The sinks were on the side, right where I plug my hot tools in to the electrical outlets, making it weird to sit hot tools on my counter when they were in use. 2. Organizing cabinets is do-able, but drawers have so much more potential when it comes to storing items that live in the bathroom.

My new vanity has 1 long trough sink with 2 faucets. I love the look of it, AND the functionality of it too. I like that the counters on the side allow me to plug my hot tools in easily. Open counter space on the sides makes more sense for the way I operate when I get ready in the morning or at night.

The new vanity also has mostly drawers, and just one cabinet. I use the cabinet to store taller items and backstock storage that I don’t get into often. The drawers are amazing! It is so easy to open one up and see what I’m looking for. Each one has the perfect amount of height clearance too. I don’t like the tall drawers in bathrooms, because it seems like my “tall” items (hair products and lotions) are too tall for the "tall" drawers anyway.

As you can see, I switched the placement of the cabinet and the drawer in the middle, if you compare it to the norm. Usually, we see false drawers sitting at the top with a cabinet underneath. I placed the cabinet at the top so that the plumbing pipes could be worked around inside of it, while still making use of as much space as possible. The drawer on the bottom does not have any pipes to work around, which is nice.

Let’s talk about the counter, built-in trough sink, and ledge! My dreams came true when Compound Concrete delivered and installed these pieces. They have many color options available, and custom-make their pieces to fit exactly as they should. The sink is so sharp looking but also slightly imperfect as concrete should look! I absolutely LOVE it.
A few last things to mention about my bathroom: I had to ability to put a larger medicine cabinet in my bathroom than what as previously there, so I did! The framers cut a bigger opening for it, and now I have more storage! Also, you might have noticed the mirror on the opposite side of the medicine cabinet. I had it mounted at a height that is comfortable for me to see in when I apply my makeup. I love it and here is the link for it!

I hope that this lengthy write-up of my bathroom remodel will inspire you to think about how you will stay organized in your new bathroom, if you are getting ready to build or remodel! So much thought was put into the design, with my lifestyle in mind, and it has paid off.

I can keep everything tucked away in organized drawers, cabinets, and shelves… and easily pull them out to use them when I need to. I might have my makeup caddy sitting on my counter while I get ready in the morning, but there’s a perfect home for it to be put away when I’m done using it, and that makes me happy because clean counters was a priority to me when I planned for this newly remodeled bathroom!
I've linked most items from my bathroom below:
For organizing tips shared regularly, follow me on instagram HERE!


I love the sleek, modern look that Laminate Vinyl Floors provide for bathroom remodels. Their vinyl options offer a luxurious feel without the hassle and expense of real wood or stone. Plus, the durability and ease of cleaning make it a win for any bathroom!